I got myself a Palm Tungsten T5 a while back to use for paperless caching. Now, before I scare away those of you with limited budgets, I'll confess that it's much more than I really need for the task -- in fact, my old Palm IIIxe, which I sold to another cacher for about $20, would have been more than adequate for the task. But the color screen is a lot easier for me to read (most of the time -- glare can be a problem on sunny days), and the additional memory along with the support for an SD memory card were big plusses for me.
You see, there are some days when I set out specifically to go caching. So creating a pocket query, getting the data into Cachemate, and hitting the road aren't big problems. BUT . . . . there are even more days -- say, about 90% of all days -- when I'm simply out and about in the Chicago metro area and find myself with some time on my hands and wishing I could find a cache or two nearby. But if I didn't know ahead of time I was going to be in that area, and that I'd have time for caching, then no PQ, no Cachemate data, and no waypoints in my GPSr.
So, I've set up a series of pocket queries that run weekly to collect all of the caches in areas of interest to me -- Northern Illinois (roughly, everything north of I-80), parts of Wisconsin (where I camp, and where my daughter goes to college, and the routes along the way), parts of New Jersey (where my in-laws live <insert your own New Jersey and/or in-laws joke here.>). Right now, in GSAK I have 5365 Illinois caches, 1366 Wisconsin caches, 998 New Jersey caches, and 127 caches in a database I call "events" -- not geocaching events per se, but any special occasion for which I want to load up caches in particular areas.
Uh-oh.
Turns out it's easier said than done. When I hotsync my PDA and start to load up the data into Cachemate -- especially the large Illinois and Wisconsin data loads -- I can watch everything progress nicely for the first couple hundred caches. But then it gets slower . . . . and slower . . . . . . . and slower . . . . . . . . . . . . . and slower . . . . well, you get the picture. And, sometimes, the load fails before it's processed all the caches.
There has to be a better and faster way. Fortunately, there is! Cachemate supports memory cards on the Palm PDAs, and in the documentation it describes how to take advantage of it. But before going into the technical details of how to do it, let me give you a quick description of why it works.
When you create your Cachemate file for the PDA and hotsync it, what happens is that Cachemate loads (or tries to load) all of the cache data into its database. If you have thousands of caches, many of which may have lengthy descriptions and/or lots of logs, that takes up a lot of space and time. When you use memory card support, though, Cachemate handles the load a bit differently. Instead of copying all of the cache data to its database, it instead loads just the cache ID and a few bits of other data, along with a pointer to the rest of the data which remains on the memory card instead of being transferred into the database. In addition, since you're going to take the hotsync process out of the procedure, you can save even more time getting the data to the PDA. So, let's move on to the geek stuff.
Step 1: Clear databases on Cachemate (optional, but recommended) For me, GSAK is my database of record. While Cachemate can merge information, I always completely replace the data with new data from GSAK. On your PDA, launch Cachemate, then from the menu, select each of your databases you are about to load, and use the CLR button to clear them out.
![]()
Step 2: Connect your PDA to your computer as a USB drive. Plug your Hotsync cable into your PDA and a USB port on your computer. (USB 2.0 is recommended, if available -- it's a lot faster.) Go to the main application screen on your PDA; there will be an application called Drive Mode. Tap on that application, then tap on the Turn Drive Mode On button.

Step 3: Create folder for Cachemate files (first time only) Your PDA will now show up in Windows Explorer as a disk drive -- or two, if you have an SD card installed. (**See important note at the end of this article.) On this new disk drive, you have to create one of the four folders that Cachemate looks for, as described in the documentation. To keep it simple, I created the \Cachemate folder. You only have to do this the first time.

Step 4: Create Cachemate files. I use GSAK, so that's what I'm using in this example. But whatever tool you use to create your Cachemate files, the process should be similar. In GSAK, you simply specify the drive letter and path for the file you're creating, pointing it to the folder you just created. Also, uncheck the box that says Install to Palm after conversion -- you don't want to do this, because there is no need for Hotsync to process the file. After you've created your files, they'll show up as .pdb files in the folder you created.

Step 5: Disconnect the PDA from the computer. And make sure you do it properly, so you don't lose any data. Down in the system area of your Windows taskbar is an icon that will allow you to "safely" disconnect your USB drive. You need to do this so that Windows will flush out its write buffers to your PDA. After Windows tells you it's safe to remove the device, then click the Turn Drive Mode Off button on your PDA.

Step 6: Launch Cachemate and load data. Launch Cachemate on your PDA. A screen will pop up telling you that new files have been found on your memory card. Click OK, and then a file import dialog will appear, once for each file you created. For each file, select the Cachemate DB you want that file imported into. If you didn't clear the DB first, then Cachemate will merge the data according to whatever identifier you selected for cachemate -- name or waypoint code.

Step 7: GO CACHING!!
How fast is it? Well, for the 5000+ Illinois caches I load, the import used to take 10-15 minutes -- if it worked at all. It often failed to complete successfully. With this new procedure, the import process on Cachemate finishes in about 30 seconds, and it always works. Do I need any more reasons to use the memory card support?
Update@21:05 -- let me clarify that this does not depend on having a separate memory card. If you can put the device in Drive Mode, then you can write to either the internal memory or the removable SD card. So if you have an older PDA that doesn't support an SD card, this may still work for you. And if your PDA does not come with a Drive Mode application, there may be a freeware version available you can download and install.
(**OK, here's the important note I promised you earlier. If you have an SD card in your PDA as well as its internal memory, it will show up as TWO separate drives when you turn on Drive Mode. And here's the kicker -- it always wants to use the lowest available drive letter plus the next consecutive drive letter. If that next consecutive drive letter is in use, it won't map the SD card. So if you have the most basic configuration with your hard drive as C: and a CD or DVD as D:, when you enter Drive Mode on your PDA, it will use drive letter E: for the internal memory, and F: for the SD card. But let's say you already have a flash drive attached as F: -- then, Drive Mode will map the internal memory as E:, but won't map the SD card at all. I tore out more than a little bit of hair before I found someone's blog post documenting this.)
Friday, July 25, 2008
Turbocharging Cachemate
Tuesday, March 4, 2008
Trip of a Lifetime
One of my students has a fairly well off step-grandmother. A couple of years ago, she decided that her grandchildren needed to get the travel bug and told them for their 13th birthday, they could go on a “trip of a lifetime,” anywhere in the world they wanted to go. My student, being the oldest of this woman’s four grandchildren just passed his thirteenth birthday last summer and this week will be hopping on a plane down to South America to tour the Galapagos Islands.
When I heard about this trip, my first thought was wondering how I could get adopted by this kid’s mother – she happens to be one of my co-workers – so I could get a trip like this as well. I guess you could say I was as green as Kermit the Frog with envy, but I got over it and decided to 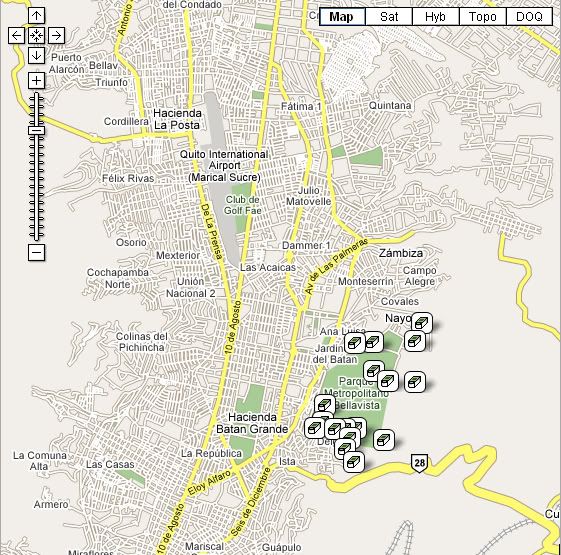
The itinerary intrigued me, however, because I noticed that he’s going to be in Quito, Ecuador for a good couple of days before he heads to the Galapagos. Knowing that he is a geocacher, I semi-facetiously asked him whether he was planning on getting any caches while down there. His initial response was, “Oh, there can’t possibly be any geocaches down in Ecuador.”
With the gauntlet thrown, I took up the challenge and did a quick search by country on geocaching.com and came up with 24 caches in Ecuador. I then quickly mapped it and put it into the Geocaching Google Map so he could see where the caches were. Most of them are concentrated in Quito, 17 in a very large metropolitan park in downtown Quito with a virtual about 8 miles north very near the equator. Once I showed him that most were regular sized caches, he was very interested. In fact, I think the words that came out of his mouth were something on the order of, “Oh, I so have to do this.” He says his grandmother will really love this, so in the process, we may hook another geocacher as well.
I quickly sent his mother an email stating, I had to look and see if there were any geocaches down in Ecuador. Her response back was, “I’ll have to send the GPSr with him when he goes.” The ball was starting to roll. They’re fairly new geocachers and aren’t premium members so they weren’t really familiar with Pocket Queries (PQ), so I volunteered to make a PQ for the local caches down there and upload them into their GPSr 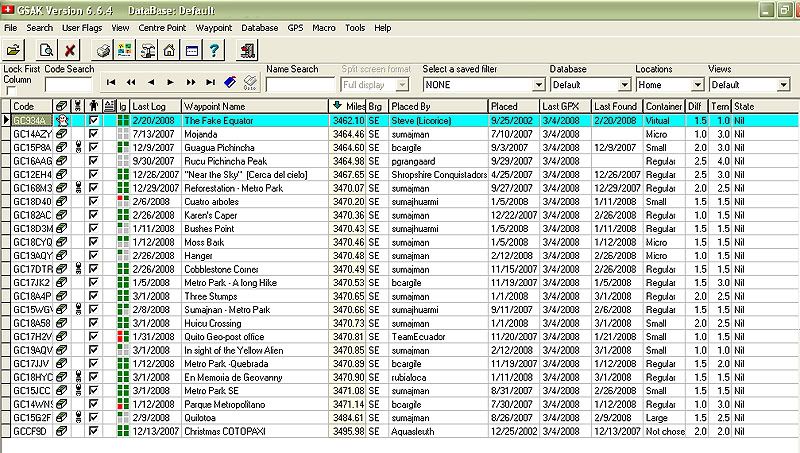
When I asked him at first, I really wasn’t expecting an enthusiastic response, figuring his time would be booked, but he said he had some open ended time the first couple of days, so this would really be cool to do. Both he and I agreed that these once in a lifetime trips do really come only once in a lifetime, so you need to make the most of them. Besides, he’ll be able to come back and state that he found a geocache near the equator. Not many people around here can boast about that.
One of these days, hopefully, I’ll get down to the Galapagos. It is on my list of things to see before I die. Whether geocaching is still around then, who knows? But at least for now, I'll be able to cache vicariously through my student when I read his logs on the caches that he found.

Tuesday, February 26, 2008
Using GSAK Polygon Filters
Finally, the last episode in the adventures of GSAK line, arc, and polygon filters! Since we've already covered lines and arcs, that would leave . . . . POLYGONS! If you were paying attention during Geometry class, you know that a polygon is is a plane figure that is bounded by a closed path or circuit, composed of a finite sequence of straight line segments (i.e., by a closed polygonal chain). These segments are called its edges or sides, and the points where two edges meet are the polygon's vertices or corners. The interior of the polygon is called its body. Also, in a simple polygon, the boundary of the polygon does not cross itself.
You did remember that, right? Right?? Oh, well, even if you didn't, I'm sure you have the idea. A triangle is a simple polygon. So is a square. So is that hexagonal stop sign at the street corner. Unlike those examples, which are all convex and often equilateral, a GSAK polygon can be any shape as long as it is simple (no crossing edges), and each of its sides can be any length.
This filter will select all of the waypoints that are contained INSIDE a closed polygon. You can have as many sides to the polygon as you wish. To keep the example simple, I will just take the route I used in the previous example, and turn it into a closed polygon by connecting my last  Second, the LAST lat/long in your polygon definition has to be the same as your FIRST – that is, you have to CLOSE the polygon. Notice in the following filter that the first and last lat/long pairs are the same, and also that the box for specifying distance is no longer available.

Here’s the map, showing the closed polygon, and all the caches contained inside that area.
 Finally, one other option that wasn’t discussed earlier is the “Exclude” option on the Arc/Poly tab. If you check this box, it basically reverses the filter – select all waypoints that are NOT within “x” miles of these points, select all waypoints that are NOT within “x” miles of this line/arc, select all waypoints that are NOT contained inside this polygon. Go back and take a look at the original map showing ALL of the northern
The "Exclude" option works just as well with points, lines, and arcs -- that is, you can find everything that is NOT within 5 miles of a point (for example), or NOT within 2.5 miles of a route. You're limited only by your imagination!

Tuesday, February 12, 2008
Using GSAK Arc Filters - Part II
Ready for a more complicated route? I’m going to travel from

And here’s what the GSAK filter looks like:

Notice that you have to list the coordinates in the filter in the order they will occur on the route! When I apply that filter, I get 197 waypoints, which are plotted on the next map.

Saturday, February 9, 2008
Using GSAK Arc Filters - Part I
Enough of Webby's warm and fuzzy stories! Let's get geeky again!
Just a short time ago, I explained the basics of using a GSAK point filter and then extended that to including multiple points in a filter. With a few clicks of the mouse, it's easy to move on to an arc filter -- similar to gc.com's "caches along a route", but working from your offline GSAK database. (In fact, before gc.com introduce the oft-requested "caches along a route", this was pretty much the only way you could do it.)
We’ll start with a real simple one. You notice that the two points I used before in Schaumburg and Lombard have a north-south road that nearly connects them. For the sake of this example, let’s assume that I plan to travel on that road, and as I travel from Schaumburg to Lombard, I’m willing to go about 1-1/2 mile off my route to find a cache. So this example is very simple. In the filter, I will select “Arc/Line” instead of “Points”, and will limit my distance to 1-1/2 miles.This gives me 44 waypoints, all within 1-1/2 miles of the black line on the map which connects the two points of the arc. In this simple example, since I only have two points, it doesn't matter in what order I list them in the filter.


Wednesday, January 30, 2008
Road Trip
I graduated from college with a degree in geography, so I love maps. I’ve always loved getting out the atlas and pour over the individual state maps and see where I might want to go next on a vacation. Where was our next road trip going to take us? Should we take this road, or that one? I wonder what this town is like? Next month, I’m planning a road trip to
There is a mystery cache in  of the summer. Anyway, this series of articles is just designed the document the road trip.
This particular road trip took some advanced planning. I decided that this one was going to take the scenic route, so I’m going to be traveling on a lot of back roads this time, which is fine with me, but making the route queries for this one took a little bit longer. After searching the geocaching data base, I was only able to find this one route that fit my needs for any part of the trip. All the other routes, I had to create. In the end, I have 8 different route queries that I’m going to have to run right before I take off on my road trip. That also is going to take some planning since I can only run five per day. I need to remember to run at least three of them two days before I leave, otherwise I’m screwed.
My next step has been to go through each route and check out the mystery/puzzle caches to see if I can solve some of the puzzles and get those. Interestingly, there don’t seem to be a whole lot of puzzle caches, but I have gone through and solved 12 puzzles for the upcoming road trip. Several of them are right along county lines and involved looking up local history for each county. Right now, I’m a little bit more knowledgeable about Calaveras, Amador,
There was a puzzle cache that used Pig Latin, one that used the symbols from a computer keyboard, one that had me investigating a certain government agency within Kern County and two cipher puzzles. All of these puzzles have been solved, now my next step is probably going to be to whittle down the list. I have over 500 caches right now, and since my GPSr doesn’t have a memory card slot, I need to get that down to under 500 waypoints for them to all fit in the unit. Once I load all the queries into GSAK I’ll start by eliminating the puzzles that I haven’t solved. That will probably do the trick, but if it doesn’t I’ll then probably drop the multi-caches. I like multi-caches, but they tend to take a little bit longer to find than regular caches and I do have some time constraints so it makes sense to drop them next.
Tick, tick, tick, tick, tick, tick, tick, tick, tick, tick, tick, tick, tick, tick, tick.

Friday, January 25, 2008
Using GSAK Point Filters - Part II
In my previous post, I showed how to use a simple GSAK point filter. As you saw, it did pretty much the same thing as filtering based on distance from your centre point, but you're not restricted to using your centre point or, for that matter, any cache in your database. The point filter can be based on any arbitrary lat/long you wish (although it's obviously useless to pick a lat/long outside of the area covered by your database).
 Now, let’s do the same thing with multiple points. Let’s say I’m going to be at the Marriott in
You can see that the list of points now includes TWO lat/long combinations. When I apply this filter, I now get 79 waypoints – 17 more than I did for just the

When I plot those on a map, I now have two clusters of waypoints – one set within 3 miles of the green flag in
Coming up next: Arc filters
Thursday, January 24, 2008
Using GSAK Point Filters - Part I
A lot of geocachers use GSAK (Geocaching Swiss Army Knife) for managing an offline database of geocaching waypoints, and most have used simple filters for focusing in on a subset of caches they're interested in. Many I've spoken to, however, have never explored the power of "point", "arc", and "polygon" filters. At first glance, they can seem intimidating -- but they're quite powerful and useful, and once you've tried them you'll find they're not that hard to use. I wrote up some documentation on this subject a while back to share with some other members of GONIL (Geocachers of Northeastern ILlinois), which I'll share with you here. Due to its length, I'll address each type of filter in a separate post. My default GSAK database contains over 4000 waypoints in northern
Let’s look at point filters first. You’ve probably used filters before where you specify an existing waypoint (or a defined GSAK “location”) as your center point and then specify a given distance from that waypoint. That filter would look something like this. A point filter is similar, in that it selects waypoints within a circular boundary, but there are two key differences – you can specify any  arbitrary lat/long coordinates as your center points (not just an existing waypoint or location), and you can have multiple center points.
We’ll start with a simple example of a single point for a point filter. Let’s say I’m going to be at a meeting at the Marriott Hotel in
One way I could do this is to find an existing cache near the Marriott and specify that as my center point in GSAK. But another way is to simply find out the lat/long of the Marriott. There are many ways to do this, but one easy way I do this is to use the website www.maporama.com, because once I find the location I want, it displays the lat/long right there on the map page. So I’ve found the Marriott at  and to the left of the map, I see that the lat/long at that location is 42.05, -88.038 (I’ve highlighted it in blue). (Important note: Maporama displays the lat/long of the CENTER of the current map – NOT the circular target you see on the map. The target may be in a different location because of how you searched. Don’t worry about whether you SEE the target or not – as long as the location you want is in the center of the map, the lat/long displayed is what you want.) Google Earth is another good option for locating the lat/long of a location for you.

So now I go to GSAK and set a filter. Click on the “Arc/Poly” tab. Enter the lat/long of the Marriott into the box on the left, select “Points” as the filter type, and specify a distance. Click “Go”.

When I apply this filter, I get 62 waypoints returned, and they look like this on the map (I put a green flag on the map to display where the Marriott is). As you can see, I could have picked that cache just SW of the Marriott and used it as my center point for a simple filter, but by specifying the lat/long of the Marriott itself, it doesn’t matter whether there’s a cache nearby.
That was pretty painless, wasn't it? In my next post, I'll show how to use multiple points in the same filter.
